I recently worked with a colleague of mine to get various network devices to use RADIUS authentication provided by a Windows Server 2008 R2 NPS server and realized how many devices lacked documentation on how to configure the NPS server. One of the devices I ended up guessing was a Cisco Wireless LAN controller and seeing how others may come across this, I decided it may be worth while to blog about this. The server I used to install the NPS role was Windows Server 2008 R2 (the configuration would be the same for Windows Server 2012) and the Wireless LAN Controller was the Cisco 4400 Series (4402).
As with setting up RADIUS for other devices, begin by configuring the RADIUS client in the RADIUS Clients node. Note that I am configuring the 2 wireless controller clients with the name CF-<thenSomeName>. The reason why I’ve named it this way will be shown as we go through the setup:
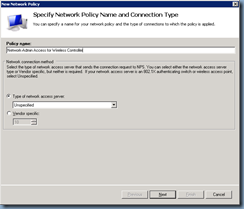
Once the client representing your wireless controllers has been configured, proceed by configuring a new Network Policy:
Policy name – name of your choice
Type of network access server - Unspecified
Click on the Add buttonin the Conditions window:
Select Windows Groups:
Add the groups you would like to grant administrative access:
Click on OK:
Select Client Friendly Name:
As mentioned earlier, I named all of the devices to start with CF- and this is because you can’t configure the policy to have multiple Client Friendly Names or else in order for the policy to match, the client authenticating would have to match all of the Client Friendly Names. This is of course not possible and that’s why I’ve named the 2 devices to start with CF- so I could use wildcards for the match. For this case, the wildcard to match a name starting with CF- and everything else afterwards is:
CF-.*
**Note that more information about pattern matching syntax can be found here:
Using Pattern-Matching Syntax in NPS
http://technet.microsoft.com/sv-se/library/dd197583(v=ws.10).aspx
Proceed with clicking on Next after you have specified the conditions:
Select Access granted:
Check Unencripted authentication (PAP, SPAP):
Leave the settings at default and click on the Next button:
Select Standard under RADIUS Attributes and click on the Add button:
Select Service-Type under Attributes and click on the Add button:
Change the Attribute Value from Commonly used for Dial-UP or VPN:
… to Others and set it to Callback Administrative:
Click on Vendor Specific under RADIUS Attributes and then the Add button:
Select Cisco-AV-Pair:
Click on the Add button:
Use either of the following for the permission to be granted:
shell:priv-lvl=15– for Network-Admins policy which will enforce privilege level 15
shell:priv-lvl=1– for Network-Support policy which will enforce privilege level 1
Click OK:
With the Vendor Specific settings configured, continue by clicking on the Next button:
Click Finish to create the policy:
Notice the new policy created:
Now try logging onto the wireless controller with an Active Directory account:


![clip_image001[4] clip_image001[4]](http://lh5.ggpht.com/-cEjKKO0kJHk/UQZtswmHSXI/AAAAAAAAXNg/dVerf4nr_KQ/clip_image0014_thumb.png?imgmax=800)
![clip_image001[6] clip_image001[6]](http://lh3.ggpht.com/-3EQ4qbeybCI/UQZtuVP_qBI/AAAAAAAAXNw/G9_oW9YGbEM/clip_image0016_thumb.png?imgmax=800)
![clip_image001[8] clip_image001[8]](http://lh4.ggpht.com/-ddRG-v3eKxI/UQZtv3uKTSI/AAAAAAAAXOA/ccsEgIvN8Lk/clip_image0018_thumb.png?imgmax=800)

![clip_image001[12] clip_image001[12]](http://lh3.ggpht.com/-Rih2z5m4Mcs/UQZtyk82s2I/AAAAAAAAXOg/4dgLI2BzZrE/clip_image00112_thumb.png?imgmax=800)
![clip_image001[14] clip_image001[14]](http://lh4.ggpht.com/-2xKUmDvmbqc/UQZtz_FWJmI/AAAAAAAAXOw/s9vFoeVxFkE/clip_image00114_thumb.png?imgmax=800)

![clip_image001[16] clip_image001[16]](http://lh5.ggpht.com/-UeiXZXTukfY/UQZt2lDU50I/AAAAAAAAXPQ/DOKfizdVAl0/clip_image00116_thumb.png?imgmax=800)
![clip_image001[18] clip_image001[18]](http://lh3.ggpht.com/-BXbC28hk7g0/UQZt5aATZWI/AAAAAAAAXPg/QtWd9xoIhZI/clip_image00118_thumb.png?imgmax=800)
![clip_image001[20] clip_image001[20]](http://lh6.ggpht.com/-EGh7-VXqBSg/UQZt62cMUwI/AAAAAAAAXPw/1PRfL9HsWbA/clip_image00120_thumb.png?imgmax=800)
![clip_image001[24] clip_image001[24]](http://lh5.ggpht.com/-fFuHk3cZH7E/UQZt81y_tqI/AAAAAAAAXQA/mTf1rybWUbo/clip_image00124_thumb.png?imgmax=800)
![clip_image001[26] clip_image001[26]](http://lh6.ggpht.com/-K0Q9_kyNaj4/UQZt-m7ZQSI/AAAAAAAAXQQ/k4UZlRCARcc/clip_image00126_thumb.png?imgmax=800)
![clip_image001[28] clip_image001[28]](http://lh6.ggpht.com/-trRgBqsC3TM/UQZuALY3atI/AAAAAAAAXQg/a07punVmczk/clip_image00128_thumb.png?imgmax=800)
![clip_image001[30] clip_image001[30]](http://lh4.ggpht.com/-Zn95Gs_Dgas/UQZuBR-UOnI/AAAAAAAAXQw/c1vTsig3_vA/clip_image00130_thumb.png?imgmax=800)
![clip_image001[32] clip_image001[32]](http://lh5.ggpht.com/-zSsGHAVlWsE/UQZuDBG2ZFI/AAAAAAAAXRA/BpfO_2Di3lU/clip_image00132_thumb.png?imgmax=800)
![clip_image001[34] clip_image001[34]](http://lh4.ggpht.com/-D7JxP3xEPSA/UQZuETA0xPI/AAAAAAAAXRQ/ksA2eIdvmgM/clip_image00134_thumb.png?imgmax=800)
![clip_image001[36] clip_image001[36]](http://lh4.ggpht.com/-rVQ1ccKeWyY/UQZuFwN2GmI/AAAAAAAAXRg/ywwkKBcqGl4/clip_image00136_thumb.png?imgmax=800)
![clip_image001[38] clip_image001[38]](http://lh5.ggpht.com/-18FAAxiFdMA/UQZuHBrup9I/AAAAAAAAXRw/aAITe-PfyVQ/clip_image00138_thumb.png?imgmax=800)
![clip_image001[40] clip_image001[40]](http://lh4.ggpht.com/-MxRoA7nmMjg/UQZuIFCxwuI/AAAAAAAAXSA/9q3oPD4bBTM/clip_image00140_thumb.png?imgmax=800)
![clip_image001[42] clip_image001[42]](http://lh3.ggpht.com/-bXxZGmccwGY/UQZuJxJxErI/AAAAAAAAXSQ/N6qyoVQXyo0/clip_image00142_thumb.png?imgmax=800)
![clip_image001[44] clip_image001[44]](http://lh6.ggpht.com/-0_MWUpot3xI/UQZuLIofRuI/AAAAAAAAXSg/KbERnbUoQ54/clip_image00144_thumb.png?imgmax=800)
![clip_image001[46] clip_image001[46]](http://lh4.ggpht.com/-uLl6UD1ZQ9Q/UQZuPfwgEnI/AAAAAAAAXSw/gqch-ekVYfw/clip_image00146_thumb.png?imgmax=800)


