Quantcast
Channel: Terence Luk
Viewing all 836 articles
Browse latest View live

Permissions required for Citrix XenDesktop 5.6 and VMware vSphere 5.1

$
0
0

As some administrators may have noticed, VMware has made quite a few changes to vSphere 5.1 and I was thrown off by the change to the layout of permissions while I configured the role for the XenDesktop service account because the only documentation available from Citrix that I could find was written for XenDesktop 5 and VMware vSphere 5.  After browsing around the permissions available in vCenter 5.1 the change I noticed was that there is no longer the section Virtual Machine –> State which would explain why when I made the attempt to assign the Create Snapshot, Remove Snapshot, Revert to Snapshot, I couldn’t find it:

http://support.citrix.com/proddocs/topic/xendesktop-rho/cds-vmware-rho.html

image

These permissions in vCenter 5.1 have since been moved to Virtual Machine –> Snapshot management:

image

Here is a screenshot of the old vCenter 5.0 Virtual Machine –> State option:

clip_image002

I think it’s important to note that I ran into the same issue when configuring the permissions for a VMware View 5.1 environment a week ago as VMware hasn’t updated their documentation either.  Seeing how I’ve been doing XenDesktop deployments quite frequently, I thought it would be a good idea to blog the permission settings so I have something to reference to in the future.  Note that the permissions haven’t changed so that much of the following Citrix eDoc still applies:

Using VMware with XenDesktop
http://support.citrix.com/proddocs/topic/xendesktop-rho/cds-vmware-rho.html

Datastore

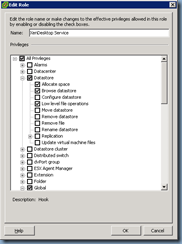
  • Allocate space
  • Browse datastore
  • Low level file operations

clip_image001

Global

  • Manage custom attributes
  • Set custom attribute

Iclip_image001[4]

Network

  • Assign network

clip_image001[6]

Resource

  • Assign virtual machine to resource pool

clip_image001[12]

Tasks

  • Create task

clip_image001[14]

Virtual machine –> Configuration

  • Add existing disk
  • Add new disk
  • Change CPU count
  • Change resource
  • Memory
  • Remove disk

clip_image001[16]clip_image001[18]

Virtual machine –> Interaction

  • Power Off
  • Power On
  • Reset
  • Suspend

clip_image001[20]clip_image001[22]

Virtual machine –> Inventory

  • Create from existing
  • Create new
  • Register
  • Remove

clip_image001[24]

Virtual machine –> Provisioning

  • Allow disk access
  • Allow virtual machine download
  • Allow virtual machine files upload
  • Clone template
  • Clone virtual machine
  • Deploy template

clip_image001[26]

Virtual machine –> Snapshot management

  • Create snapshot
  • Revert to snapshot

image

Hope this helps anyone out there looking for updated permission settings for configuring the role for the XenDesktop 5.6 service account.


Problems launching Citrix XenApp 6.5 applications through CAG VPX 50 with the error: “Unable to launch your application. Contact your help desk with the following information: Cannot connect to the Citrix XenApp server. There is no Citrix XenApp server configured on the specified address.”

$
0
0

Problem

Ran into an issue the other day where I would have no problems logging into a Citrix XenApp 6.5 environment published with a Citrix Access Gateway VPX 50 (NS10.0: Build 73.5.nc) but noticed that whenever I tried launching an application, the status bar would get stuck at the following point:

clip_image002

After a few seconds, the following message is displayed:

Unable to launch your application. Contact your help desk with the following information:
Cannot connect to the Citrix XenApp server. There is no Citrix XenApp server configured on the specified address.

clip_image002[4]

This error is consistent with published XenApp 6.5 applications and XenDesktop 5.6 VDIs.  No errors were logged on the XenApp servers or the Web Interface servers.

Solution

What ended up being the problem was that the Secure Access settings for the XenApp Web Site configured on the web interface server was configured with Direct for the Access Method:

image

Once this was changed to Gateway direct, applications began launching properly:

image

Configuring vCenter role permissions for VMware vSphere 5.1 and VMware Horizon View 5.2 (View Manager and View Composer)

$
0
0

As some administrators may have noticed, VMware has made quite a few changes to vSphere 5.1 and I was a bit thrown off by the change to the layout of permissions while I configured the role for the VMware View service account because it doesn’t look like the VMware Horizon View 5.2 documentation was written for vSphere 5.1.  After browsing around the permissions available in vCenter 5.1 the change I noticed was that there is no longer the section Virtual Machine –> State as stated in the documentation:

http://pubs.vmware.com/view-52/index.jsp?topic=%2Fcom.vmware.view.installation.doc%2FGUID-467F552F-3034-4917-A985-B5E5FEC5C68F.html

clip_image001

These permissions in vCenter 5.1 have since been moved to Virtual Machine –> Snapshot:

image

Here is a screenshot of the old vCenter 5.0 Virtual Machine –> State option:

image

Seeing how I got a bit confused with this, I’m sure my colleagues are going to ask me about this so I thought I’d write this blog post so I can refer them to it.  First off, it’s important to note that there are 2 sets of permissions in the VMware Horizon View 5.2 documentation you need to be aware about that is listed in the following URL:

Configuring User Accounts for vCenter Server and View Composer
http://pubs.vmware.com/view-52/index.jsp?topic=%2Fcom.vmware.view.installation.doc%2FGUID-997107E5-F66D-494C-B2BA-A74977C7804C.html

The first one is:

View Manager Privileges Required for the vCenter Server User
http://pubs.vmware.com/view-52/index.jsp?topic=%2Fcom.vmware.view.installation.doc%2FGUID-A878F876-B359-42FC-9124-A1E34BFB3319.html

These permissions are only enough for you to configure View Manager to deploy virtual desktops that do not rely on the View Composer.  If you intend on deploying virtual desktops such as linked clones which requires View Composer then you’ll need to configure the additional permissions listed in the second URL:

View Composer Privileges Required for the vCenter Server User

http://pubs.vmware.com/view-52/index.jsp?topic=%2Fcom.vmware.view.installation.doc%2FGUID-467F552F-3034-4917-A985-B5E5FEC5C68F.html

With this clarified, the following are the permissions required to configure the role in VMware vCenter 5.1 for VMware Horizon View 5.2:

Datastore

  • Allocate space
  • Browse datastore
  • Low level file operations

clip_image001[4]

Folder

  • Create folder
  • Delete folder

clip_image001[6]

Global

  • Disable methods
  • Enable methods
  • System tag

clip_image001[8]

Network

  • Assign network
  • Configure
  • Move network
  • Remove

clip_image001[10]

Resource

  • Assign virtual machine to resource pool
  • Migrate powered off virtual machine

clip_image001[12]

Virtual machine à Configuration

  • All items

clip_image001[14]

Virtual machine à Interaction

  • Power Off
  • Power On
  • Reset
  • Suspend

clip_image001[16]

Virtual machine à Provisioning

  • Allow disk access
  • Clone virtual machine
  • Customize
  • Deploy template
  • Read customization specifications

clip_image001[18]

Virtual machine à Snapshot management

  • Create snapshot
  • Remove Snapshot
  • Rename Snapshot
  • Revert to snapshot

clip_image001[20]

Hope this helps anyone out there looking for updated permission settings for configuring the role for the VMware Horizon View 5.2’s vCenter 5.1 service account.

Signing into Lync 2013 client presents the warning message: “Lync cannot verify that the server is trusted for your sign-in address. Connect anyway?”

$
0
0

I’ve been meaning to blog about an issue I noticed in environments with disparate namespaces (internal domain name is different than external) where no matter how I configured the DNS for the internal or public forward lookup zones, I could not get around the following warning message presented to users signing into Lync 2013 clients:

The connection to the server is encrypted.

View Certificates

Lync cannot verify that the server is trusted for your sign-in address. Connect anyway?

image

As noted in Jeff Schertz’s post:

http://blog.schertz.name/2012/12/lync-2013-client-autodiscover/

… the new Lync 2013 client now attempts to lookup the 2 new Lync Discover records introduced in Lync Server cumulative update 4 for supporting mobility clients:

  • lyncdiscoverinternal.domain.com
  • lyncdiscover.domain.com
  • _sipinternaltls._tcp.domain.com
  • _sip._tls.domain.com
  • sipinternal.domain.com
  • sip.domain.com
  • sipexternal.domain.com

Prior to the introduction of the 2 new records when the first record that the Lync 2010 looks up was _sipinternaltls._tcp.domain.com, I was able to get around the mismatch between the sign-in address which uses the public domain that does not match the FQDN of the internal Lync front end server as described in my previous post:

Quick note about Lync Server 2010 automatic sign-in for environments with different external and internal domain names
http://terenceluk.blogspot.com/2011/04/quick-note-about-lync-server-2010.html

However, making the same change to the lyncdiscoverinternal CNAME record:

image

… so that it points to an A record that uses the public domain name:

imageimage

image

… did not work.  So just as Jeff demonstrated on his blog, I went on to try doing traces with Wireshark as well.

Confirming Ordering of Lookup Records

First, I tested signing in with my Lync 2010 client and as expected, the order DNS records are as follows:

  • _sipinternaltls._tcp.domain.com
  • _sip._tls.domain.com
  • sipinternal.domain.com
  • sip.domain.com
  • sipexternal.domain.com

image

Signing with the Lync 2013 client confirmed the 2 new records that are now ahead of the old ones:

  • lyncdiscoverinternal.domain.com
  • lyncdiscover.domain.com
  • _sipinternaltls._tcp.domain.com
  • _sip._tls.domain.com
  • sipinternal.domain.com
  • sip.domain.com
  • sipexternal.domain.com

clip_image001

Testing in Production Environment

With the ordering of the records confirmed, I went ahead and tried signing into the Lync 2013 client and review the Wireshark packet captures which appeared to do the following:

The client queries the record lyncdiscoverinternal.domain.com:

image

Although I have a lyncdiscoverinternal CNAME set up the in public domain forward lookup zone, it looks like the Lync 2013 client still continues to query for the next lyncdiscover.domain.com record regardless of whether it receives a reply or not:

image

Another entry for the lyncdiscoverinternal query is shown in the packet capture:

image

Then as expected, the DNS server replies with a CNAME record for the initial query (0xeeb3) of lyncdiscoverinternal and as shown in the response, the CNAME record that the DNS responds with is the internal Lync server name with the public domain FQDN mapped to the internal IP address of the Lync front end server address:

image

Notice that the next entry is the DNS server responding with No such name for the lyncdiscover record query (0x3c75) which is expected because that record does not exist in the DNS server:

image

The next entry continues the DNS server to the Lync 2013 client response for the lyncdiscoverinternal query which continues to list the internal Lync server name with the public domain FQDN mapped to the internal IP address of the Lync front end server:

image

The next entry is what confuses me because the previous entries appear to suggest that the Lync 2013 client queries for lyncdiscoverinternal.domain.com, receives the CNAME record <name of Lync front end server>.publicDomain.com with the A record address pointing to the internal IP address but rather than attempting to sign into the server with the returned IP address, it continues to query the DNS server for the Lync server internal FQDN record:

<name of Lync front end server>.internalDomain.internal

image

I originally thought the Lync 2013 client was performing a reverse lookup of the previous CNAME record <name of Lync front end server>.publicDomain.com but the next entry shows that the client is clearly performing a query (0x5f56) for the internal FQDN of the Lync server:

image

From here, the client proceeds to sign into the IP address of the Lync server’s internal FQDN which brings us to the warning message shown at the beginning of this post.

Unfortunately, I’ve tried modifying the DNS records in different ways (i.e. using A records instead of CNAME records for lyncdiscoverinternal) but would continue to run into the same issue.  The only 2 ways I could think of was either to completely remove the lyncdiscoverinternal record so that the Lync client falls back to the _sipinternaltls._tcp.domain.com record but that means breaking the mobility clients that sign in while on the internal network.  The only option available that I could think of was to use the TrustModelData registry key to explicitly force the client to trust public domain.  More information about this registry key can be found in one of my previous posts here:

Location of the “TrustModelData: registry key for the Lync 2013 Client
http://terenceluk.blogspot.com/2013/02/location-of-trustmodeldata-registry-key.html

Note that I did all the tracing shown above probably more than 2 months ago so I may have forgotten a few items I noticed while writing this post now so please excuse any mistakes I may have made during the analysis.

Reversing VMware View Optimization Guide for Windows 7 Configuration

$
0
0

I was recently asked by a colleague whether I had prewritten scripts to reverse the configuration changes that the VMware View Optimization Guide for Windows 7 performed on a master image and while I didn’t have exactly what he asked for, I did have scripts to reverse a subset of those settings.  The reason why my scripts only reverse a subset of those settings is because I don’t use all of the optimizations provided by VMware and the reasons can be found in one of my previous posts here:

Suggested changes to VMware View Optimization Guide for Windows 7
http://terenceluk.blogspot.com/2013/03/suggested-changes-to-vmware-view.html

With that being said, the changes I make to the VMware provided optimization scripts isn’t too far off so if I thought I’d provide my script here which could serve as a starting point to reverse all the changes made by the original scripts:

rem Setting Default HKCU values by loading and modifying the default user registry hive

reg load "hku\temp" "%USERPROFILE%\..\Default User\NTUSER.DAT"

reg DELETE "hku\temp\Software\Policies\Microsoft\Windows\Control Panel\Desktop" /v SCRNSAVE.EXE /f

reg DELETE "hku\temp\Software\Policies\Microsoft\Windows\Control Panel\Desktop" /v ScreenSaveTimeOut /f

reg DELETE "hku\temp\Software\Policies\Microsoft\Windows\Control Panel\Desktop" /v ScreenSaverIsSecure /f

reg DELETE "hku\temp\Software\Microsoft\Windows\CurrentVersion\Internet Settings\Cache" /v Persistent /f

reg DELETE "hku\temp\Software\Microsoft\Feeds" /v SyncStatus /f

reg DELETE "hku\temp\Software\Microsoft\Windows\CurrentVersion\Policies\Explorer" /v HideSCAHealth /f

reg unload "hku\temp"

rem Making modifications to the HKLM hive

reg DELETE "HKEY_LOCAL_MACHINE\SOFTWARE\Policies\Microsoft\Internet Explorer\Main" /v DisableFirstRunCustomize /f

reg ADD "HKEY_LOCAL_MACHINE\SYSTEM\CurrentControlSet\Control\Session Manager\Memory Management\PrefetchParameters" /v EnableSuperfetch /t REG_DWORD /d 3 /f

reg ADD "HKEY_LOCAL_MACHINE\SOFTWARE\Policies\Microsoft\Windows\WindowsUpdate\AU" /v NoAutoUpdate /t REG_DWORD /d 0x0 /f

reg DELETE "HKEY_LOCAL_MACHINE\SOFTWARE\Policies\Microsoft\Windows NT\SystemRestore" /v DisableSR /f

reg ADD "HKEY_LOCAL_MACHINE\SYSTEM\CurrentControlSet\services\Disk" /v TimeOutValue /t REG_DWORD /d 60 /f

reg DELETE "HKEY_LOCAL_MACHINE\SOFTWARE\Image" /f

reg ADD "HKEY_LOCAL_MACHINE\SYSTEM\CurrentControlSet\services\eventlog\Application" /v MaxSize /t REG_DWORD /d 0x6e00000 /f

reg ADD "HKEY_LOCAL_MACHINE\SYSTEM\CurrentControlSet\services\eventlog\Application" /v Retention /t REG_DWORD /d 0x0 /f

reg DELETE "HKEY_LOCAL_MACHINE\System\CurrentControlSet\Control\Network\NewNetworkWindowOff" /f

reg ADD "HKEY_LOCAL_MACHINE\SYSTEM\CurrentControlSet\services\eventlog\System" /v MaxSize /t REG_DWORD /d 0x6e00000 /f

reg ADD "HKEY_LOCAL_MACHINE\SYSTEM\CurrentControlSet\services\eventlog\System" /v Retention /t REG_DWORD /d 0x0 /f 

reg ADD "HKEY_LOCAL_MACHINE\SYSTEM\CurrentControlSet\services\eventlog\Security" /v MaxSize /t REG_DWORD /d 0x6e00000 /f

reg ADD "HKEY_LOCAL_MACHINE\SYSTEM\CurrentControlSet\services\eventlog\Security" /v Retention /t REG_DWORD /d 0x0 /f

reg ADD "HKEY_LOCAL_MACHINE\SYSTEM\CurrentControlSet\Control\CrashControl" /v CrashDumpEnabled /t REG_DWORD /d 0x2 /f

reg ADD "HKEY_LOCAL_MACHINE\SYSTEM\CurrentControlSet\Control\Terminal Server" /v fDenyTSConnections /t REG_DWORD /d 0x1 /f

reg ADD "HKEY_LOCAL_MACHINE\SYSTEM\CurrentControlSet\Control\Terminal Server\WinStations\RDP-Tcp" /v UserAuthentication /t REG_DWORD /d 0x0 /f

reg ADD "HKEY_LOCAL_MACHINE\Software\Microsoft\Windows\CurrentVersion\policies\system" /v EnableLUA /t REG_DWORD /d 0x1 /f

reg DELETE "HKEY_LOCAL_MACHINE\Software\Policies\Microsoft\Windows\Sideshow" /f

rem Using Powershell to perform Windows Services modifications

Powershell Set-Service 'BDESVC' -startuptype "manual"

Powershell Set-Service 'wbengine' -startuptype "manual"

Powershell Set-Service 'DPS' -startuptype "automatic"

Powershell Set-Service 'UxSms' -startuptype "automatic"

Powershell Set-Service 'Defragsvc' -startuptype "manual"

Powershell Set-Service 'HomeGroupListener' -startuptype "manual"

Powershell Set-Service 'HomeGroupProvider' -startuptype "manual"

Powershell Set-Service 'iphlpsvc' -startuptype "automatic"

Powershell Set-Service 'MSiSCSI' -startuptype "manual"

Powershell Set-Service 'swprv' -startuptype "manual"

Powershell Set-Service 'CscService' -startuptype "automatic"

Powershell Set-Service 'SstpSvc' -startuptype "manual"

rem Powershell Set-Service 'wscsvc' -startuptype "disabled" <-- no Delayed Start

reg ADD "HKEY_LOCAL_MACHINE\SYSTEM\CurrentControlSet\services\wscsvc" /v Start /t REG_DWORD /d 0x2 /f

net stop wscsvc

Powershell Set-Service 'SSDPSRV' -startuptype "manual"

Powershell Set-Service 'SysMain' -startuptype "automatic"

Powershell Set-Service 'TabletInputService' -startuptype "manual"

Powershell Set-Service 'upnphost' -startuptype "manual"

Powershell Set-Service 'SDRSVC' -startuptype "manual"

Powershell Set-Service 'WerSvc' -startuptype "manual"

Powershell Set-Service 'MpsSvc' -startuptype "automatic"

Powershell Set-Service 'ehRecvr' -startuptype "manual"

Powershell Set-Service 'ehSched' -startuptype "manual"

Powershell Set-Service 'Wlansvc' -startuptype "manual"

Powershell Set-Service 'WwanSvc' -startuptype "manual"

rem Making miscellaneous modifications

Powershell enable-computerrestore -drive c:\

net start MpsSvc

netsh advfirewall set allprofiles state on

powercfg -H ON

net start "sysmain"

fsutil behavior set DisableLastAccess 0

rem Making modifications to Scheduled Tasks

schtasks /change /TN "\Microsoft\Windows\Defrag\ScheduledDefrag" /Enable

schtasks /change /TN "\Microsoft\Windows\SystemRestore\SR" /Enable

schtasks /change /TN "\Microsoft\Windows\Registry\RegIdleBackup" /Enable 

schtasks /change /TN "\Microsoft\Windows Defender\MPIdleTask" /Enable

schtasks /change /TN "\Microsoft\Windows Defender\MP Scheduled Scan" /Enable 

schtasks /change /TN "\Microsoft\Windows\Maintenance\WinSAT" /Enable 

Using PowerCLI to create new role and assign service account used by VMware Horizon View 5.2 (View Manager & View Composer) permissions for vCenter Server 5.1

$
0
0

As demonstrated in one of my previous posts:

Using PowerCLI to create new role and assign service account used by VMware View Manager 5.1 permissions for vCenter Server

http://terenceluk.blogspot.com/2013/03/using-powercli-to-create-new-role-and.html

… you can use PowerCLI to create, configure and assign the role required for the VMware View Manager and View Composer service account to access the vCenter.  As I notice that I am involved with VMware Horizon View projects more and more, I find it important to cut back the amount of time required to setup or fix account permissions so this post serves to demonstrate how to create, configure and assign the role and service account for VMware Horizon View 5.2 and VMware vCenter 5.1.

Before I being, note that the documentation for the required permissions that I will be using can be found at the following URLs:

Configuring User Accounts for vCenter Server and View Composer
http://pubs.vmware.com/view-52/index.jsp?topic=%2Fcom.vmware.view.installation.doc%2FGUID-997107E5-F66D-494C-B2BA-A74977C7804C.html

View Manager Privileges Required for the vCenter Server User
http://pubs.vmware.com/view-52/index.jsp?topic=%2Fcom.vmware.view.installation.doc%2FGUID-A878F876-B359-42FC-9124-A1E34BFB3319.html

View Composer Privileges Required for the vCenter Server User

http://pubs.vmware.com/view-52/index.jsp?topic=%2Fcom.vmware.view.installation.doc%2FGUID-467F552F-3034-4917-A985-B5E5FEC5C68F.html

Assigning permissions to variable

Prior to creating the role, we’ll need to assign the required permissions to a variable and prior to assigning the permissions to variable, we’ll need to identify the unique Id for the privilege by using the following PowerCLI command for each permission required:

Get-VIPrivilege -Name “<Name of permissions>” | FL

The reason why we need to identify the unique Id is because permissions such as Power On are generic and can be found in nodes such as Interaction:

clip_image001

… and vApp:

clip_image001[4]

… which are permissions we don’t need.  Without making this post too long, I will demonstrate the output for the Power On permissions in the PowerCLI:

Connect-VIServer <yourvCenterFQDN>

Get-VIPrivilege -Name “Power On” | FL

clip_image001[6]

Note that the Power On permissions we’re interested in is under the ParentGroupID VirtualMachine.Interact and the unique Id is VirtualMachine.Interact.PowerOn.

Once I’ve gone through the list of privileges required, I was able to assign the permissions with the following cmdlet to assign the permissions to a variable:

$priv = Get-VIPrivilege -ID Folder.Create,Folder.Delete,Datastore.AllocateSpace,Datastore.Browse,Datastore.FileManagement,Host.Config.AdvancedConfig,VirtualMachine.Config.AddExistingDisk,VirtualMachine.Config.AddNewDisk,VirtualMachine.Config.AddRemoveDevice,VirtualMachine.Config.AdvancedConfig,VirtualMachine.Config.CPUCount,VirtualMachine.Config.Resource,VirtualMachine.Config.ManagedBy,VirtualMachine.Config.ChangeTracking,VirtualMachine.Config.DiskLease,VirtualMachine.Config.MksControl,VirtualMachine.Config.DiskExtend,VirtualMachine.Config.HostUSBDevice,VirtualMachine.Config.Memory,VirtualMachine.Config.EditDevice,VirtualMachine.Config.QueryFTCompatibility,VirtualMachine.Config.QueryUnownedFiles,VirtualMachine.Config.RawDevice,VirtualMachine.Config.ReloadFromPath,VirtualMachine.Config.RemoveDisk,VirtualMachine.Config.Rename,VirtualMachine.Config.ResetGuestInfo,VirtualMachine.Config.Annotation,VirtualMachine.Config.Settings,VirtualMachine.Config.SwapPlacement,VirtualMachine.Config.Unlock,VirtualMachine.Config.UpgradeVirtualHardware,VirtualMachine.Interact.PowerOff,VirtualMachine.Interact.PowerOn,VirtualMachine.Interact.Reset,VirtualMachine.Interact.Suspend,VirtualMachine.Inventory.CreateFromExisting,VirtualMachine.Inventory.Create,VirtualMachine.Inventory.Move,VirtualMachine.Inventory.Register,VirtualMachine.Inventory.Delete,VirtualMachine.Inventory.Unregister,VirtualMachine.Provisioning.DiskRandomAccess,VirtualMachine.Provisioning.Clone,VirtualMachine.Provisioning.Customize,VirtualMachine.Provisioning.DeployTemplate,VirtualMachine.Provisioning.ReadCustSpecs,VirtualMachine.State.CreateSnapshot,VirtualMachine.State.RemoveSnapshot,VirtualMachine.State.RenameSnapshot,VirtualMachine.State.RevertToSnapshot,Resource.AssignVMToPool,Resource.ColdMigrate,Global.EnableMethods,Global.DisableMethods,Global.SystemTag,Global.VCServer,Network.Assign,Network.Config,Network.Move,Network.Delete

Creating the VMware View service role and assigning permissions

With the permissions stored in a variable, what need to do is combine the cmdlet to create the role and assign the stored permissions as such:

$priv = Get-VIPrivilege -ID Folder.Create,Folder.Delete,Datastore.AllocateSpace,Datastore.Browse,Datastore.FileManagement,Host.Config.AdvancedConfig,VirtualMachine.Config.AddExistingDisk,VirtualMachine.Config.AddNewDisk,VirtualMachine.Config.AddRemoveDevice,VirtualMachine.Config.AdvancedConfig,VirtualMachine.Config.CPUCount,VirtualMachine.Config.Resource,VirtualMachine.Config.ManagedBy,VirtualMachine.Config.ChangeTracking,VirtualMachine.Config.DiskLease,VirtualMachine.Config.MksControl,VirtualMachine.Config.DiskExtend,VirtualMachine.Config.HostUSBDevice,VirtualMachine.Config.Memory,VirtualMachine.Config.EditDevice,VirtualMachine.Config.QueryFTCompatibility,VirtualMachine.Config.QueryUnownedFiles,VirtualMachine.Config.RawDevice,VirtualMachine.Config.ReloadFromPath,VirtualMachine.Config.RemoveDisk,VirtualMachine.Config.Rename,VirtualMachine.Config.ResetGuestInfo,VirtualMachine.Config.Annotation,VirtualMachine.Config.Settings,VirtualMachine.Config.SwapPlacement,VirtualMachine.Config.Unlock,VirtualMachine.Config.UpgradeVirtualHardware,VirtualMachine.Interact.PowerOff,VirtualMachine.Interact.PowerOn,VirtualMachine.Interact.Reset,VirtualMachine.Interact.Suspend,VirtualMachine.Inventory.CreateFromExisting,VirtualMachine.Inventory.Create,VirtualMachine.Inventory.Move,VirtualMachine.Inventory.Register,VirtualMachine.Inventory.Delete,VirtualMachine.Inventory.Unregister,VirtualMachine.Provisioning.DiskRandomAccess,VirtualMachine.Provisioning.Clone,VirtualMachine.Provisioning.Customize,VirtualMachine.Provisioning.DeployTemplate,VirtualMachine.Provisioning.ReadCustSpecs,VirtualMachine.State.CreateSnapshot,VirtualMachine.State.RemoveSnapshot,VirtualMachine.State.RenameSnapshot,VirtualMachine.State.RevertToSnapshot,Resource.AssignVMToPool,Resource.ColdMigrate,Global.EnableMethods,Global.DisableMethods,Global.SystemTag,Global.VCServer,Network.Assign,Network.Config,Network.Move,Network.Delete

New-VIRole -Name "VMware View Service" -Privilege $priv

clip_image001[8]

Once this role has been created:

clip_image001[10]

… the last step was to execute the following to add your domain service account to the role:

$rootFolder = Get-Folder -NoRecursion

$myPermission = New-VIPermission -Entity $rootFolder -Principal “domain\svc_view” -Role “VMware View Service” -Propagate:$true

clip_image001[12]

… which will assign the domain service account to the vCenter object (top most level) indicated as a requirement in the documentation here:

In vSphere Client, right-click the vCenter Server at the top level of the inventory, click Add Permission, and add the vCenter Server user.

Note

You must define the vCenter Server user at the vCenter Server level.

http://pubs.vmware.com/view-51/index.jsp?topic=%2Fcom.vmware.view.installation.doc%2FGUID-80D653FA-BCC0-45B9-AF84-5E0EEC2AD139.html

clip_image001[14]

Note that the cmdlet above was tested with VMware Horizon View 5.2 and vCenter 5.1.0 Build 947673.

Using PowerCLI to create new role and assign service account used by Citrix XenDesktop 5.6 permissions for vCenter Server 5.1

$
0
0

As demonstrated in one of my previous posts for VMware Horizon View 5.2:

Using PowerCLI to create new role and assign service account used by VMware Horizon View 5.2 (View Manager & View Composer) permissions for vCenter Server 5.1
http://terenceluk.blogspot.com/2013/04/using-powercli-to-create-new-role-and.html

… you can use PowerCLI to create, configure and assign the role required for the VMware View Manager and View Composer service account to access the vCenter.  As my current role requires me to architect and implement VDI solutions from VMware and Citrix, I thought I’d also write the equivalent post for Citrix XenDesktop 5.6 demonstrating how to create a role in vCenter with permissions required by the XenDesktop DDC (Desktop Delivery Controller) to deploy and manage desktop catalogs.

Before I being, note that the documentation for the required permissions that I will be using can be found at the following URLs:

Using VMware with XenDesktop
http://support.citrix.com/proddocs/topic/xendesktop-rho/cds-vmware-rho.html

More information about the permissions required can be found in one of my previous posts here:

Permissions required for Citrix XenDesktop 5.6 and VMware vSphere 5.1
http://terenceluk.blogspot.com/2013/04/permissions-required-for-citrix.html

Assigning permissions to variable

Prior to creating the role, we’ll need to assign the required permissions to a variable and prior to assigning the permissions to variable, we’ll need to identify the unique Id for the privilege by using the following PowerCLI command for each permission required:

Get-VIPrivilege -Name “<Name of permissions>” | FL

The reason why we need to identify the unique Id is because permissions such as Power On are generic and can be found in nodes such as Interaction:

clip_image001

… and vApp:

clip_image001[4]

… which are permissions we don’t need.  Without making this post too long, I will demonstrate the output for the Power On permissions in the PowerCLI:

Connect-VIServer <yourvCenterFQDN>

Get-VIPrivilege -Name “Power On” | FL

clip_image001[6]

Note that the Power On permissions we’re interested in is under the ParentGroupID VirtualMachine.Interact and the unique Id is VirtualMachine.Interact.PowerOn.

Once I’ve gone through the list of privileges required, I was able to assign the permissions with the following cmdlet to assign the permissions to a variable:

$priv = Get-VIPrivilege –ID Datastore.AllocateSpace,Datastore.Browse,Datastore.FileManagement,Host.Config.AdvancedConfig,VirtualMachine.Config.AddExistingDisk,VirtualMachine.Config.AddNewDisk,VirtualMachine.Config.CPUCount,VirtualMachine.Config.Resource,VirtualMachine.Config.Memory,VirtualMachine.Config.RemoveDisk,VirtualMachine.Interact.PowerOff,VirtualMachine.Interact.PowerOn,VirtualMachine.Interact.Reset,VirtualMachine.Interact.Suspend,VirtualMachine.Inventory.CreateFromExisting,VirtualMachine.Inventory.Create,VirtualMachine.Inventory.Register,VirtualMachine.Inventory.Delete,VirtualMachine.Provisioning.DiskRandomAccess,VirtualMachine.Provisioning.GetVmFiles,VirtualMachine.Provisioning.PutVmFiles,VirtualMachine.Provisioning.CloneTemplate,VirtualMachine.Provisioning.Clone,VirtualMachine.Provisioning.DeployTemplate,VirtualMachine.State.CreateSnapshot,VirtualMachine.State.RevertToSnapshot,Resource.AssignVMToPool,Global.ManageCustomFields,Global.SetCustomField,Network.Assign,Task.Create

Creating the VMware View service role and assigning permissions

With the permissions stored in a variable, what need to do is combine the cmdlet to create the role and assign the stored permissions as such:

$priv = Get-VIPrivilege -ID Datastore.AllocateSpace,Datastore.Browse,Datastore.FileManagement,Host.Config.AdvancedConfig,VirtualMachine.Config.AddExistingDisk,VirtualMachine.Config.AddNewDisk,VirtualMachine.Config.CPUCount,VirtualMachine.Config.Resource,VirtualMachine.Config.Memory,VirtualMachine.Config.RemoveDisk,VirtualMachine.Interact.PowerOff,VirtualMachine.Interact.PowerOn,VirtualMachine.Interact.Reset,VirtualMachine.Interact.Suspend,VirtualMachine.Inventory.CreateFromExisting,VirtualMachine.Inventory.Create,VirtualMachine.Inventory.Register,VirtualMachine.Inventory.Delete,VirtualMachine.Provisioning.DiskRandomAccess,VirtualMachine.Provisioning.GetVmFiles,VirtualMachine.Provisioning.PutVmFiles,VirtualMachine.Provisioning.CloneTemplate,VirtualMachine.Provisioning.Clone,VirtualMachine.Provisioning.DeployTemplate,VirtualMachine.State.CreateSnapshot,VirtualMachine.State.RevertToSnapshot,Resource.AssignVMToPool,Global.ManageCustomFields,Global.SetCustomField,Network.Assign,Task.Create

New-VIRole -Name "XenDesktop Service" -Privilege $priv

clip_image001[8]

Once this role has been created:

clip_image001[10]

… the last step was to execute the following to add your domain service account to the role:

$rootFolder = Get-Folder -NoRecursion

$myPermission = New-VIPermission -Entity $rootFolder -Principal “domain\svc_XenDesktop” -Role “XenDesktop Service” -Propagate:$true

clip_image001[12]

… which will assign the domain service account to the vCenter object (top most level).

Note that the cmdlets above were tested with Citrix XenDesktop 5.6 and vCenter 5.1.0 Build 947673.

Starting Google Earth on Citrix XenDesktop 5.6 virtual desktop prompts the message: ‘DirectX’ mode not supported

$
0
0

Problem

You’ve followed the instructions provided by the following Citrix XenDesktop 5.6 Feature Pack 1 eDocs:

HDX Optimization Pack for Google Earth
http://support.citrix.com/proddocs/topic/xendesktop-56fp1/hdx-opt-pack-for-google-earth.html

… and copy the d3d9.dll file to:

%ProgramFiles(x86)%\Google\Google Earth\client\alchemy\ogles20

%ProgramFiles%\Google\Google Earth\client

%ProgramFiles%\Google\Google Earth\plugin

… but notice that you still receive the following prompt:

‘DirectX’ mode not supported

clip_image001

Please start Google Earth again after making one of the changes.

clip_image001[4]

Solution

After searching around on the internet and noticing other people having the same issues, what ended up working for me was to copy the file to the following directory as well:

C:\Windows\SysWOW64

**Note that the d3d9.dll file in the C:\Windows\SysWOW64 folder is owned by the TrustedInstaller account so you’ll need to take ownership of the file then grant yourself permissions before you can either rename or overwrite it.


Removing a virtual desktop in VMware View 5.x throws the error: “Provisioning error occurred for Machine : Unable to remove Machine from inventory”

$
0
0

Problem

You attempt to remove a virtual machine from the VMware View administration console:

image

… but you notice that VMware View is unable to delete the virtual desktop and the follow error is logged in the events:

Error: Provisioning error occurred for Machine <VDI-Name>: unable to remove Machine from inventory

image

You will also notice that the failed actual is automatically recovered by powering back on the virtual desktop:

Automatic error recovery for Pool <pool-name>: attempting to restart Machine <VDI-name>

image

Solution

While there are probably multiple reasons why this error would be thrown, the environment I had to troubleshoot turned out to be because the Active Directory permissions were not set correctly.  The permissions required for the View service account can be found here:

http://pubs.vmware.com/view-52/index.jsp?topic=%2Fcom.vmware.view.installation.doc%2FGUID-3446495C-FEC8-425C-AFF8-A6CAABA5E973.html

What I’ve noticed is that most administrators miss an important step that isn’t obvious in the documentation and that is the Write All Properties permissions in the Properties tab:

image

In the screenshot above, note that the Object tab has a Write all properties permission and selecting this permission does not enable the Write all properties under the Properties tab shown here:

image

Forgetting this selection is one of the reasons why the error shown earlier in the post is thrown when attempting to remove virtual desktops from the VMware View administration console.

Lync Server 2013 Edge server replication issues on Windows Server 2012

$
0
0

Problem

You’ve completed a new greenfield deployment or successfully migrated from Lync Server 2010 to Lync Server 2013 with Windows Server 2012 servers as the base operating system but noticed that your Lync Edge servers are not replicating and executing the Invoke-CsManagementStoreReplicationStatus cmdlet then the Get-CsManagementStoreReplicationStatus display’s the following:

image

Note how the Lync front end server has True for UpToDate while the Edge server does not.

You’ve tried using the Lync Logging Tool on the front end server to log the following components:

  • XDS_File_Transfer_Agent
  • XDS_Master_Replicator
  • XDS_Replica_Replicator

image

… but could not capture any errors useful for the troubleshooting.

Deleting the RtcReplicaRoot folder on the Lync Edge server then running a repair on the Core Components also does not correct this issue.

Reviewing all of the application, system and Lync logs in the event viewer does not reveal any errors.

You’ve tried adding the SendTrustedIssuerListREG_DWORD registry key into HKLM\SYSTEM\CurrentControlSet\Control\SecurityProviders\SCHANNEL but that did not fix the issue:

clip_image001

Browsing the URL https://<lyncEdgeServer.someDomain.internal:4443/replicationwebservice loads the Windows Communicator Foundation service page properly with one abnormal behavior which is that you receive a Confirm Certificate prompt with the message:

Confirm this certificate by clicking OK. If this is not the correct certificate, click Cancel.

image

… clicking on OK brings you to the regular expected webpage:

image

Solution

This problem actually got me quite frustrated as I’ve done numerous deployments of Lync yet could not figure out why this particular environment gave me a problem I seemingly couldn’t find any clues that pointed me in the right direction so I opened up a support call with Microsoft.  The engineer spent almost a total of 2 days before he figured out what was wrong.

To make a long story short, Windows Server 2012 apparently is more stringent on performing certificate checks because Windows Server 2012 implements checks for a higher level of trust for certificate authentication.  A more detailed explanation can be found at the following KB:

Lync Server 2013 Front-End service cannot start in Windows Server 2012
http://support.microsoft.com/kb/2795828

First off, the reason why we were getting the strange Confirm Certificate prompt when we browse the https://<lyncEdgeServer.someDomain.internal:4443/replicationwebservice URL:

image

… is because I had a certificate in the Current User store:

image

You might be wondering why I had this certificate in there and it’s because I had to use our internal Enterprise CA’s enrollment webpage (/certsrv) to obtain the Lync Front End server’s certificate because we had RCC integration with the Avaya AES server and using the regular certificate tool in the Lync deployment wizard did not work.  This meant that I had to install it under the logged on user’s account, export it along with the private key from the current user store, then re-import it into the computer store.  I didn’t end up deleting the certificate so when I deleted it, closed Internet Explorer and navigated to the https://<lyncEdgeServer.someDomain.internal:4443/replicationwebservice URL, I was no longer prompted with the window landing directly onto the expected Windows Communication Foundation Service page:

image

Second, as per the KB article, Windows Server 2012 basically does not like certificates that are in the incorrect place.  We noticed that an intermediate certificate was placed in the Trusted Root Certification Authorities in the local computer store of the Edge server so it was removed:

image

We then proceeded to check for certificates in the Intermediate Certification Authorities and Trusted People stores to ensure there weren’t any that shouldn’t be in there.  Once we completed this, a restart of the replication services then followed by the Invoke-CsManagementStoreReplicationStatus cmdlet showed that the front end and Edge server began to replicate:

image

This was definitely one of the more difficult issues I’ve come across and seeing how I couldn’t find any helpful information on the internet, I hope this post will help anyone who may come across this in their environment.

VMware vSphere virtual machines constantly runs a CHKDSK after every reboot

$
0
0

Ran into an interesting problem today while upgrading an existing vSphere 4.1 infrastructure to 5.1 with the latest build (1021289). What we noticed was that when all of the virtual machines that were migrated over to the new 5.1 environment would run a chkdsk every the Windows 2008 R2 operating system was rebooted:

clip_image002

… and whenever we ran a chkntfs c:, the return would be that the disk was dirty. After going through trial and error by moving virtual machines from patched to non-patched ESXi 5.1 hosts without any luck, we opened up a support ticket with VMware and ended up discovering that the issue we had was because the servers had the security update 2823324 patch installed just a week ago. More information on this patch can be found here:

MS13-036: Description of the security update for the Windows file system kernel-mode driver (ntfs.sys): April 9, 2013
http://support.microsoft.com/kb/2823324

What we ended up doing was the following:

  • Uninstall the security patch
  • Reboot
  • Let the chkdsk run (the difference we noticed after having the patch uninstalled was that this chkdsk ran much longer as if it did fix something during the process)
  • Reboot again

This resolved the issue.

Issuing certificates for VMware Horizon View 5.2 servers with Microsoft Enterprise Certificate Authority

$
0
0

I’ve recently been asked quite a few times in over the last few months on how to properly request and issue certificates for VMware View servers ever since the later versions of 5.x began throwing warnings when servers are using their default self-signed certificates and not a certificate that is issued by a trusted certificate authority such as an internal Microsoft Enterprise CA or a public CA such as GoDaddy, Verisign, etc.  I’ve always suggested using a public CA simply because mobile devices don’t natively trust certificates issued by an internal CA and because it’s not a domain joined device, there is really no automated way to place the internal CA’s certificate into the trusted store.  With that being said, if you don’t have any mobile or non-domain joined devices in your environment, you can use an internal Microsoft Enterprise CA for your View connection server certificates.  The following demonstrates the process:

Upon successfully deploying your View Connection servers (both internal and external), you will noticed that the dashboard lists all of them with an error:

image

… and clicking on the server object will display the error:

Name: <serverName>

Version: 5.1.2

Status: Server’s certificate does not match the URL.

SSL Certificate: Invalid

Connections: 0

image

Before I begin demonstrating using a Microsoft Enterprise Root CA to issue the certificates, note that the official VMware View documentation for obtaining SSL certificates can be found in the following URL:

Obtaining SSL Certificates for VMware Horizon View Servers
http://pubs.vmware.com/view-52/index.jsp?topic=%2Fcom.vmware.view.certificates.doc%2FGUID-358E1A54-DDD7-4A76-B9CB-198E0F7F76D4.html

image

… another old KB article that is more specific to using a Microsoft CA to obtain a certificate can be found here:

Managing SSL Certificates in VMware View 5.1 using an internal Microsoft Certificate Authority (2020913)
http://kb.vmware.com/selfservice/microsites/search.do?language=en_US&cmd=displayKC&externalId=2020913

With the location of the official documentation out of the way, the certificate I intend on issuing will contain the common name:

  • vdi.domain.com

… and the following SAN entries:

  • vdi.domain.internal
  • vdi
  • svrvmvc01.domain.internal
  • svrvmvc01
  • svrvmvc02.domain.internal
  • svrvmvc02
  • svrvmvce01.domain.internal
  • svrvmvce01
  • svrvmvce02.domain.internal
  • svrvmvce02

By requesting a certificate with all of these names, I can simply use one certificate for all of my servers (2 internal and 2 external View connection servers).  I get asked a lot about why I like putting the NetBIOS name in certificates any reason is that I’m quite lazy when it comes to typing in the URL for servers as I tend not to use the FQDN in most cases unless my laptop is not a part of the domain or if the DHCP servers do not issue the suffix for a domain. While I can’t speak for others, my guess is that there are probably others like me out there and since we don’t pay extra for having additional SAN entries when issuing certificates from an internal private CA, why not put them in?  What’s also important to note is that Certificate Authorities (CAs) have accepted worldwide guideline changes and will no longer issue SAN SSL Certificates that are not in a legitimate FQDN format as of November 2015.  I found out about this a few weeks back when trying to issuing a 3 year GoDaddy certificate with NetBIOS names so keep that in mind when planning your certificate.

Begin by logging onto one of your View Connection server, open the MMC console and add the Local Computer store’s Certificate snap-in:

image

Right click on the Certificates node under Certificates (Local Computer) –> Personal –> Certificates and select All Tasks –> Request New Certificate:

image

Click on Next:

image

Select Active Directory Enrollment Policy and click Next:

image

Note how I have a Web Server Exportable certificate template in the list which is a duplicate of the Web Server template but with the Private Key is Exportable enabled.  The reason why this is important is because we will need to export this certificate to other servers so proceed with select the certificate and click on the More information is required to enroll for this certificate. Click here to configure settings. link:

image

The following Certificate Properties window is where we enter the information required for the certificate:

image

You don’t necessarily have to fill in all of the attributes but the following are the fields that I usually fill in:

E = tluk@domain.com

CN = vdi.domain.com

OU = IT

O = Company

L = Hamilton

S = Hamilton

C = BM

Adding SAN entries is simply selecting the DNS as the Type under the Alternative name section:

image

With the Subject tab for the Certificate Properties filled out, proceed with clicking on the General tab and type in vdm as the Friendly name.  Note that this field MUST contain vdm or your View connection servers will not use this certificate. 

clip_image001

Clicking OK in the window above will complete issuing of the certificate to the server:

image

With the certificate now in the local computer store, test the certificate by restarting the VMware View Connection Server service:

clip_image001[4]

clip_image001[6]

clip_image001[8]

Log back into the administration console:

image

Note how the server with the certificate is now labeled with a green square indicating the error is gone:

image

Note that if you continue to see a red square complaining about the certificate, check the certificate properties and ensure the friendly name has the string vdm:

image

Now that we’ve confirmed the certificate works, proceed with exporting the certificate with the private key:

image

clip_image001[10]

Make sure you export the private key:

clip_image001[12]

Export as a PFX file:

clip_image001[14]

clip_image001[16]

clip_image001[18]

clip_image001[20]

clip_image001[22]

Then copy the PFX file to the other VMware View Connection servers and import it:

image

clip_image001[24]

clip_image001[26]

clip_image001[28]

clip_image001[30]

clip_image001[32]

clip_image001[34]

clip_image001[36]

image

Restart the services on the server:

clip_image001[38]

clip_image001[40]

Note that it may also be necessary to restart the other servers as well to update the error:

clip_image001[42]

Hope this helps anyone looking for information on using a Microsoft Enterprise CA to issue certificates for VMware View connection servers.

Unable to send instant messages or view presence information for federated partner in Lync Server 2013

$
0
0

Problem

You’ve configured federation between two Lync Server 2013 environments and noticed that one of the organizations can send instant messages and see presence information but the other one cannot.  The following is the organization that can send instant messages and see presence:

image

While the other company displays a globe indicating that the user is a federated contact and is able to receive messages, presence information is labeled as “unknown”:

clip_image001[4]

An attempt to send a message to this federated contact will display spinning dots:

clip_image001[6]

… then subsequently fail with the message:

When contacting your support team, reference error ID 504 (source ID 239).

Troubleshooting information is available online, including best practices for using Lync.
Test
When contacting your support team, reference error ID 1 (source ID 0).

Troubleshooting information is available online, including best practices for using Lync.

clip_image001[8]

A quick debugging session with the logging tool on the front end server of the user who is unable to send or see presence information will show the following:

TL_INFO(TF_PROTOCOL) [0]0C88.14F4::04/24/2013-22:53:16.498.0000358e (SIPStack,SIPAdminLog::ProtocolRecord::Flush:2387.idx(196))[2663723319] $$begin_record

Trace-Correlation-Id: 2663723319

Instance-Id: 271E

Direction: incoming

Peer: svrgalyncedge01.ganet.internal:5061

Message-Type: response

Start-Line: SIP/2.0 430 Flow Failed

From: <sip:tluk@lyncNOT-WorkingDomain.bm>;tag=BE180080

To: <sip:tluk@lyncWorkingDomain.bm>;tag=0da93f28e3;epid=c0f4c0bf1f

Call-ID: 6c22e601bf384fbcb7aad1e83cf0ce57

CSeq: 2 NOTIFY

Via: SIP/2.0/TLS 10.99.1.33:54576;branch=z9hG4bK233B2AEC.2289D0E28FA1DC67;branched=FALSE;ms-received-port=54576;ms-received-cid=900

Content-Length: 0

ms-diagnostics: 1046;reason="Failed to connect to a federated peer server";fqdn="sip.lyncWorkingDomain.bm";peer-type="FederatedPartner";winsock-code="10060";winsock-info="The peer did not respond to the connection attempt";source="sip.lyncNOT-WorkingDomain.bm"

image

TL_INFO(TF_PROTOCOL) [0]0C88.14F4::04/24/2013-22:53:16.529.0000391f (SIPStack,SIPAdminLog::ProtocolRecord::Flush:2387.idx(196))[3715596209] $$begin_record

Trace-Correlation-Id: 3715596209

Instance-Id: 271F

Direction: incoming

Peer: svrgalyncedge01.ganet.internal:5061

Message-Type: response

Start-Line: SIP/2.0 504 Server time-out

From: "Terence Luk"<sip:tluk@lyncNOT-WorkingDomain.bm>;tag=8831ef87b3;epid=5f9c85c89d

To: "Terence Luk"<sip:tluk@lyncWorkingDomain.bm>;tag=0d2e9aac10;epid=c0f4c0bf1f

Call-ID: 9ff1cec1aa4e45cb89a737719a3a64dd

CSeq: 8 INFO

Via: SIP/2.0/TLS 10.99.1.33:54576;branch=z9hG4bK80E90095.A9B38655901FAC69;branched=FALSE;ms-received-port=54576;ms-received-cid=900

Via: SIP/2.0/TLS 10.99.1.33:49485;ms-received-port=49485;ms-received-cid=400

Content-Length: 0

ms-diagnostics: 1046;reason="Failed to connect to a federated peer server";fqdn="sip.lyncWorkingDomain.bm";peer-type="FederatedPartner";winsock-code="10060";winsock-info="The peer did not respond to the connection attempt";source="sip.lyncNOT-WorkingDomain.bm"

image

TL_INFO(TF_DIAG) [0]0C88.14F4::04/24/2013-22:53:16.529.00003e8a (SIPStack,SIPAdminLog::WriteDiagnosticEvent:1198.idx(778))[3715596209] $$begin_record

Severity: information

Text: Response successfully routed

SIP-Start-Line: SIP/2.0 504 Server time-out

SIP-Call-ID: 9ff1cec1aa4e45cb89a737719a3a64dd

SIP-CSeq: 8 INFO

Peer: 10.99.1.33:49485

Data: destination=tluk@lyncNOT-WorkingDomain.bm

image

TL_INFO(TF_PROTOCOL) [0]0C88.14F4::04/24/2013-22:53:16.529.00003ee0 (SIPStack,SIPAdminLog::ProtocolRecord::Flush:2387.idx(196))[3715596209] $$begin_record

Trace-Correlation-Id: 3715596209

Instance-Id: 271F

Direction: outgoing

Peer: 10.99.1.33:49485

Message-Type: response

Start-Line: SIP/2.0 504 Server time-out

From: "Terence Luk"<sip:tluk@lyncNOT-WorkingDomain.bm>;tag=8831ef87b3;epid=5f9c85c89d

To: "Terence Luk"<sip:tluk@lyncWorkingDomain.bm>;tag=0d2e9aac10;epid=c0f4c0bf1f

Call-ID: 9ff1cec1aa4e45cb89a737719a3a64dd

CSeq: 8 INFO

Via: SIP/2.0/TLS 10.99.1.33:49485;ms-received-port=49485;ms-received-cid=400

Content-Length: 0

ms-diagnostics: 1046;reason="Failed to connect to a federated peer server";fqdn="sip.lyncWorkingDomain.bm";peer-type="FederatedPartner";winsock-code="10060";winsock-info="The peer did not respond to the connection attempt";source="sip.lyncNOT-WorkingDomain.bm"

clip_image001[10]

Solution

After reviewing the logs, I decided to test the port connectivity from the Edge servers and noticed that the Edge server for the organization that wasn’t able to send messages or see presence information was unable to telnet to the federated partner’s Edge server SIP URL via port 5061 even though it was able to connect via 443.  This began to make sense as the problematic organization could see the globe indicating the contact was a federated partner but was unable to message or see presence information.  A quick change in the firewall rule and confirming that the Edge server for the problematic organization was able to connect via port 5061 corrected this problem.

clip_image001[12]

clip_image001[14]

Blocking security banner for Citrix XenApp Servers

$
0
0

A common problem that many Citrix administrators come across is when an Active Directory GPO is configured to present a security banner to users who log onto domain joined servers or workstations.  The problem this poses is that applications published on Citrix XenApp servers will present a window with this security warning to users and will require them to interactively acknowledge the message by clicking on the OK button before the application begins to launch:

image

One of the ways around this is to block the policy all together by using the Block Inheritance option for an OU where the Citrix XenApp servers are placed but if doing so means having to reapply various policies that are inherited, creating a new GPO to disable the security banner may be more desirable.  As simple this task may seem, I’ve been asked quite a few times on how to do this so the following outlines the steps required.

Begin by either creating a new policy or editing an existing one is applied to the XenApp server computer objects.  Edit the policy and navigate to:

Computer Configuration –> Policies –> Windows Settings –> Security Settings –> Local Policies –> Security Options.  The 2 settings we’re interested in are:

  • Interactive logon: Message text for users attempting to log on
  • Interactive logon: Message title for users attempting to log on

image

The question I often get asked is how can I disable this policy if the only option is to select Define this policy setting in the template:

clip_image001[4] clip_image001[6]

Looking at the policy settings would lead many to believe that by enabling the policy and not defining a message may present users with a blank window to confirm but this is actually not the case so proceed with enabling both settings but not enter any content:

clip_image001[8]clip_image001[10]

clip_image001[12]

Once this policy has been set and applied to the XenApp servers, proceed with executing gpupdate /force on the servers then try to launch an application again.

XenApp 6.5 published Lync 2013 client crashes when launched through Citrix Web Interface Server portal

$
0
0

Problem

You’ve successfully installed the Lync 2013 client on your Citrix XenApp6.5 servers but noticed that when you launch the published application through the Web Interface portal, it crashes with the following output:

Microsoft Lync has stopped working

Windows can check online for a solution to the problem.

Check online for a solution and close the program

Close the program

clip_image001

Continuing to click the View problem details displays the following:

Problem signature:

  Problem Event Name:                        APPCRASH

Application Name:                             lync.exe

  Application Version:                           15.0.4420.1017

  Application Timestamp:                     5067326f

  Fault Module Name:                          LyncDesktopViewModel.dll

  Fault Module Version:                        15.0.4420.1017

  Fault Module Timestamp:                  506732ae

  Exception Code:                                  c0000005

  Exception Offset:                                000401bf

  OS Version:                                          6.1.7601.2.1.0.18.10

  Locale ID:                                             1033

Additional information about the problem:

  LCID:                                                     1033

Read our privacy statement online:

http://go.microsoft.com/fwlink/?linkid=104288&clcid=0x0409

If the online privacy statement is not available, please read our privacy statement offline:

C:\Windows\system32\en-US\erofflps.txt

clip_image001[4]

You’ve confirmed that your Citrix XenApp server has been patched with Hotfix Rollup Pack 1 for Citrix XenApp 6.5 for Microsoft Windows Server 2008 R2 found here:

http://support.citrix.com/article/CTX132122

image

Solution

While there may be various reasons that could cause this crash, what fixed the issue for me was to patch the Lync 2013 client with the February cumulative update patches found here:

Lync 2013 client update (v15.0.4454.1506)

x86 - http://www.microsoft.com/downloads/details.aspx?FamilyId=95804c44-9308-4dd0-a0dd-88087aca0812

x64 - http://www.microsoft.com/downloads/details.aspx?FamilyId=e440d931-41c1-4206-a864-82f0e706ca81

Office 2013 MSO update (v15.0.4454.1504 - required for February 2013 update)

x86 - http://www.microsoft.com/downloads/details.aspx?FamilyId=cef3ff2c-23bc-4b41-84f5-efd4a0e1b5f7

x64 - http://www.microsoft.com/downloads/details.aspx?FamilyId=76c7a4af-8952-450c-99a5-16d06248f2aa

I had the 32-bit Lync 2013 client installed so the two packages I downloaded are the following:

  • lyncloc2013-kb2760512-fullfile-x86-glb.exe
  • msores2013-kb2767852-fullfile-x86-glb.exe

clip_image001[6]


Launching a Citrix XenApp 6.5 published application hangs at: “Please wait for the Local Session Manager…”

$
0
0

Problem

You’ve received complaints from users that they are unable to successfully launch Citrix XenApp 6.5 published applications because while the Citrix Receiver launches and attempts to connect to the XenApp server, it hangs at the:

Please wait for the Local Session Manager…

clip_image001

… stage for a few minutes and eventually disconnects.  Attempting to directly remote desktop to the server exhibits the same behavior:

image

… but you are able to eventually log into the server.

The users experiencing this problem are already a part of the Remote Desktop Users group and you noticed that this issue goes away if you were to grant the user local administrator permissions.

Solution

One of the first hits I received while Google-ing the issue was a Microsoft KB that supplied a hotfix:

"Please wait for Local Session Manager" message remains for several minutes when you disconnect from a computer that is running Windows Server 2008 or Windows Server 2008 R2 during the logon process

http://support.microsoft.com/kb/2661001

Unfortunately, this applying this hotfix did not correct the issue.  The next search result was the following thread on the Citrix forums:

http://forums.citrix.com/thread.jspa?threadID=291092&start=0&tstart=0

… which showed that users had mixed results with 2 other solutions:

#1 – Delete the usrclass.dat:

Several users has had luck deleting the usrclass.dat hidden file from the directory:

C:\Users\Default\AppData\Local\Microsoft\Windows

… so I went ahead to delete it and restarted the XenApp server but noticed that this did not correct my problem.

#1 – Remove Users permissions to the TSTheme.exe file:

Another solution proposed by a Citrix engineer was to remove the Users permissions to a file named TSTheme.exe that was located in the directory:

C:\Windows\System32\

clip_image001[4]

Note that the file is owned by the TrustedInstaller group so you will need to take ownership over the file in order to remove the permissions:

clip_image001[6]

imageimage

clip_image001[8]

image

clip_image001[10]

clip_image001[12]

Once the Users group was removed, users who were not a part of the local administrators group on the XenApp server no longer had to wait for minutes at the Please wait for the Local Session Manager…stage and were now able to launch applications through the Web Interface portal.

Launching a Citrix XenApp 6.5 application published through a Citrix Access Gateway throws the error: “Unable to launch your application. Contact your help desk with the following information: Cannot connect to the Citrix XenApp server. Socket operation on non-socket.”

$
0
0

Problem

You attempt to launch a Citrix XenApp 6.5 application published through a Citrix Access Gateway but the Citrix Receiver throws the error:

Unable to launch your application. Contact your help desk with the following information: Cannot connect to the Citrix XenApp server. Socket operation on non-socket.

clip_image001

image

Solution

While there are probably various reasons why this error will be thrown but the one of the reasons are describe in the following KB:

Error: "Unable to launch your application." Appears When you Launch Published Applications
http://support.citrix.com/article/CTX134940

While the Maximum Number of Users on the CAG I was working with was set correctly, I noticed that the Virtual Server mode was set to SmartAccess Mode:

image

image

Switching it to Basic Mode:

image

Logging into Citrix XenDesktop with Profile Management 4.1 gets stuck at the “Welcome” screen

$
0
0

Problem

You have a new Citrix XenDesktop 5.6 desktop catalog deployed that uses Citrix Profile Management 4.1 to roam all of the user profile settings that your current Active Directory Redirected Folders doesn’t handle but noticed that after installing your applications and deploying the pool, users attempting to log in gets stuck indefinitely at the Welcome screen:

clip_image001

As a troubleshooting step, you’ve updated Profile Management from 4.1.0 to 4.1.2 (http://support.citrix.com/article/CTX134616) but still notice the same symptoms.

Solution

While I’m sure there are plenty of reasons out there that can cause this issue, the reason why the desktop pool I was working with exhibited this behavior was because we had ESET 5.0.2126.0 antivirus agent installed onto the Windows 7 desktop:

clip_image001[6]

Rather than change the settings of the agent which I didn’t have permissions to, I went ahead to try turning off Profile Streaming in the Profile Management GPO as such:

Computer Configuration –> Administrative Templates –> Citrix –> Profile Management –> Streamed user profiles –> Profile Streaming

clip_image001[8]clip_image001[1] 

… which ended up fixing the issue.  I won’t go into the details of what you lose by not configuring this policy but will paste the description for it here:

With profile streaming, users' profiles are synchronized on the local computer only when they are needed. Registry entries are cached immediately, but files and folders are only cached when accessed by users.

clip_image001[10]

Increasing vCPU and memory for Citrix XenDesktop 5.6 virtual desktops

$
0
0

I’ve recently been asked about how to change the amount of vCPU and memory for Citrix XenDesktop desktop catalogs that have already been deployed and as XenDesktop administrators would know, the following screen with configuration parameters to set the vCPU and memory is presented when creating the new desktop catalog:

clip_image001

However, once the desktop catalog has been created, we no longer have access to these options.  Manually changing the master image and/or the VDI desktops doesn’t work because subsequent desktops that are deployed will be configured with the same vCPU and memory as originally specified.

The solution to this is actually quite simple and that is to use PowerShell cmdlets to change the configuration for the desktop catalog.  The following are the PowerShell cmdlets we’ll need to change these settings:

Get-ProvScheme
http://support.citrix.com/static/kc/CTX127254/help/Get-ProvScheme.html

Set-ProvScheme
http://support.citrix.com/static/kc/CTX127254/help/Set-ProvScheme.html

Changing Memory for Desktops

Begin by using the Get-ProvScheme to get the ProvisioningSchemeName for the pool you would like to modify:

PS C:\Users\tluk> Get-ProvScheme

ProvisioningSchemeUid    : 98ba4e9e-4b29-4ca7-885a-f689b664a2ed

ProvisioningSchemeName   : London_svrvcenter03

CpuCount                 : 1

MemoryMB                 : 4096

DiskSize                 : 40

MasterImageVM            : XDHyp:\HostingUnits\svrvcenter03\Normal.resourcepool\win7ent64tmp.vm\Snappy.snapshot

MasterImageVMDate        : 4/26/2013 2:20:41 PM

IdentityPoolUid          : 499727d7-3648-454a-9a30-1c934efffca1

IdentityPoolName         : London

HostingUnitUid           : 935be19a-7941-465e-9377-1673962f7525

HostingUnitName          : svrvcenter03

CleanOnBoot              : True

TaskId                   :

Metadata                 : {Citrix_DesktopStudio_UpdateId = 113152a9-82eb-4595-808e-9d1725d7c6dc:6cea07ff-1c5a-4b1e-80f8-a252e9b7984c}

MachineCount             : 5

ControllerAddress        : {svrctxddc01.domain.internal, svrctxddc02.domain.internal}

VMMetadata               : {H, 4, s, I...}

UsePersonalVDiskStorage  : False

PersonalVDiskDriveLetter :

PersonalVDiskDriveSize   : 0

PS C:\Users\tluk>

image

Make a note of the ProvisioningSchemeName and then use the Set-ProvScheme to set the new memory:

Set-ProvScheme -ProvisioningSchemeName "London_svrvcenter03" -VMMemoryMB "8192"

image

Note that you won’t receive an output when executing the Set-ProvScheme cmdlet.

To confirm that the changes to the pool have been applied, use the Get-ProvScheme command to display the pool properties:

image

Changing vCPU for Desktops

Changing vCPUs (CpuCount) is similar to memory but rather than using VMMemoryMB switch, use the VMCpuCount as shown in the following:

Set-ProvScheme -ProvisioningSchemeName "London_svrvcenter03" -VMCpuCount “2”

image

--------------------------------------------------------------------------------------------------------------------------------------------------------------------

Note that changing these settings will only apply to new desktops deployed for the pool and not for existing desktops.  This means that if you had 200 desktops in the pool, simply executing updating the catalog with a new snapshot will not change the CPU or memory.  The only way to update them would be to use vSphere PowerCLI to change the settings for the existing VDIs or delete them and recreate the desktops if they are not persistent.

Citrix XenDesktop 5.6 virtual desktops continuously prompts the message: “You must restart your computer to apply these changes”

$
0
0

Problem

You’ve completed a new build of a Windows 7 master image desktop for XenDesktop 5.6 and proceed with creating the new desktop catalog and add the desktops to a desktop group.  Once the desktops have been deployed, you continue by connecting a desktop in the pool but noticed that you receive the following prompt with the following message:

You must restart your computer to apply these changes

Before restarting, save any open files and close all programs.

image

You’ve confirmed that your master image does not prompt you for a restart but noticed the desktops in the pool always do.

Solution

This issue was new to me because throughout all of the deployments I’ve done with XenDesktop, I’ve never encountered this.  The only difference between this deployment and all of the others is that this one is built on vSphere 5.1 with vCenter build 947673 and ESXi build 1065491 hosts (my previous deployments are either 4.1 or 5.0).  A quick search on Google reveals the following Citrix KB:

Case Study: MCS-Created Windows 7 VDAs Display 'You must restart your computer to apply these changes' Error Message when Starting
http://support.citrix.com/article/CTX132721

While the environment described in this article does not directly match mine (especially because the hypervisor is Microsoft Hyper-V 2008 R2), I went ahead and tried using the instructions to see if it would correct my problem.  The following are the steps I performed:

  1. Shutdown master image
  2. Add an additional disk by using an existing identity disk from another desktop in a pool
  3. Power on master image
  4. Restart the master image a few times
  5. Shutdown master image
  6. Remove identity disk
  7. Create a new snapshot for the master image
  8. Update catalog with new snapshot

The Good News:

One of the unexpected behaviors I noticed was that I did not receive a prompt asking me to restart after adding the identity disk to the master image but I can confirm that after performing these steps, the desktops in the pool no longer prompted me to restart the desktop as if it had found and installed new hardware. 

The Bad News:

This was great news until I logged into the master image and noticed that the name of the master image was now the name of the desktop that owned the identity disk I used to attach to the desktop.  I didn’t think too much about this being issue as I figure it probably copied the identity information from the desktop in the pool but what I noticed was that as soon as I changed the name of the master image back to the original, removed it from the domain and restarted, the radio button to join the desktop to the domain would be grayed out:

clip_image001

What makes it more strange is that if I change it back to the same name as the desktop that I used the identity disk and reboot, the option will be available again:

clip_image001[4]

The Workaround:

This was definitely an odd behavior and I wasn’t about to go live with such an issue.  After trying various operations with the master image without any luck, I went ahead and reverted back to a snapshot prior to attaching the identity disk.  Seeing how it appears adding the disk to the master image and booting it up caused Windows to assume the identity provided by the identity disk, I proceeded to try adding the disk without booting up with it.  With the master image powered on, I went to the master image’s virtual machine settings and performed a hot add of the identity disk:

clip_image001[6]

clip_image001[10]

clip_image001[12]

clip_image001[16]

clip_image001[8]

I continued by clicking OK to apply the changes, went to the console of the master image to confirm that identity disk shows up and then went ahead to remove the disk from the master image:

clip_image001[20]

Once the disk was removed, I restarted the master image a few times, created a new snapshot then updated the desktop catalog.  Once the update to the base disk was complete, I noticed that the virtual desktops in the pool no longer prompted for a restart as if new hardware was found and installed.

Viewing all 836 articles
Browse latest View live


<script src="https://jsc.adskeeper.com/r/s/rssing.com.1596347.js" async> </script>